
Comment utiliser l'impression DTF pour obtenir un motif à effet broderie ?
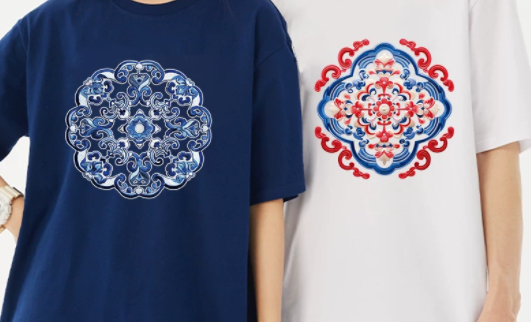
L'impression DTF (Direct-to-Film) est une méthode d'impression moderne, efficace et flexible.
Elle peut parfaitement simuler la texture 3D et les détails délicats de la broderie traditionnelle.
Le meilleur ? Vous n'avez pas besoin d'aiguilles, de fils ou de logiciels compliqués de numérisation pour broderie.
Ainsi, vous conservez le charme artistique de la broderie, mais vous éliminez ses limites en termes de complexité de conception et de vitesse de production.
Voici un guide simple et étape par étape pour vous aider à obtenir un effet broderie réaliste avec l'impression DTF.
Nous aborderons la préparation du design, le choix de l'équipement, les étapes opérationnelles et les conseils clés.
1. Comment Préparer le Design pour la Simulation d'Effet Broderie en DTF ?
La clé pour simuler la broderie avec l'impression DTF est simple :
Restaurer la texture et les détails des points de broderie grâce à la conception numérique.
Votre design détermine directement le réalisme de l'effet broderie final.
Voici les points clés pour la préparation du design :
1.1 Choisir un Logiciel de Conception et des Modèles Appropriés
Utilisez un logiciel de conception graphique professionnel pour créer ou modifier vos motifs.
Il est préférable de choisir des outils pouvant simuler des effets de broderie.
Voici quelques options logicielles recommandées :
-
Adobe Photoshop (la version Bêta est préférable) : Il dispose d'un filtre de broderie paramétrique.
-
Vous pouvez rapidement ajuster la densité des points, l'épaisseur du fil et la profondeur de la texture avec celui-ci.
-
Adobe Illustrator / CorelDRAW : Excellents pour les motifs de style broderie basés sur des vecteurs.
-
Pensez à du texte épais ou à des motifs décoratifs simples --- ils ne seront pas déformés à l'impression.
-
Modèles de broderie numérisés existants : Vous pouvez utiliser directement des modèles matures.
-
Convertissez-les simplement aux formats PSD, AI ou PDF et ajustez-les pour l'impression DTF.
1.2 Optimiser les Détails du Design pour Simuler les Caractéristiques de la Broderie
La broderie traditionnelle a des caractéristiques évidentes : texture des points, sensation de 3D et légères irrégularités.
Votre conception numérique doit reproduire ces détails pour éviter d'avoir l'air d'une impression plate.
-
Simuler la texture des points : Utilisez le filtre de broderie paramétrique de Photoshop.
-
Ajustez la densité des points (pour contrôler la couverture), l'épaisseur du fil (épais pour une broderie lourde, fin pour une broderie délicate) et la longueur du fil (correspondre à la taille du motif).
-
Si vous ajustez manuellement, utilisez un pinceau pour dessiner des lignes fines en zigzag ou des points de satin.
-
Ajoutez de petites imperfections pour imiter les irrégularités naturelles de la vraie broderie.
-
Améliorer la sensation de 3D : Ajoutez un style de calque Biseautage et Emboss dans Photoshop.
-
Essayez le biseau intérieur, la technique de ciselure dure, une profondeur de 100 à 200 % et un angle de 120° pour une lumière naturelle.
-
Ajoutez un effet d'ombre (mode produit, légèrement plus foncé que la couleur principale) pour donner l'impression que les fils de broderie sont en relief.
-
Ajustement des couleurs : Choisissez des couleurs correspondant aux vrais fils à broder.
-
Pensez aux couleurs de fil de coton mat ou de fil polyester brillant.
-
Évitez les couleurs néon ultra-vives --- elles ne sont pas courantes en broderie traditionnelle.
-
Réduisez un peu la saturation des couleurs pour un rendu plus réaliste.
-
Convertissez le design en mode CMJN pour garantir des couleurs cohérentes à l'impression.
-
Traitement des bords : Gardez les bords du motif un peu rugueux.
-
Évitez les bords de découpe numérique trop lisses --- cela simule les extrémités désordonnées des fils de broderie.
-
Pour les motifs complexes, ajoutez un fin "bord de fil" autour du contour pour renforcer la sensation de broderie.
1.3 Paramètres de Fichier pour l'Impression DTF
Assurez-vous que votre fichier de design répond aux exigences de l'impression DTF.
Cela évite le flou ou la distorsion des couleurs.
-
Résolution : Réglez à 300 PPP à la taille d'impression prévue.
-
Cela garantit que les détails des points apparaissent clairement.
-
Arrière-plan : Utilisez un arrière-plan transparent.
-
Cela facilite le placement du motif sur des tissus de différentes couleurs.
-
Vous éviterez également des bordures blanches inutiles après transfert.
-
Format de fichier : Enregistrez en PNG haute résolution, PSD ou PDF.
-
Pour les logos et le texte, utilisez des fichiers vectoriels (AI, EPS) --- ils ne perdront pas en qualité lors de la mise à l'échelle.
2. Comment Préparer l'Équipement et les Matériaux pour un Effet Broderie en DTF ?