
How do I install an embroidery frame onto an embroidery machine
Author Jeffry: Senior Embroidery Technician and Digitizer with 12 years of factory mass production experience proficient in computerized embroidery parameter debugging, cotton fabric embroidery troubleshooting and textile thread performance testing. All guidance is based on front-line machine operation data, AATCC industry standard tests and long-term mass production verification.
The quality of embroidery hoop installation directly determines the stability of the embroidery process and the final product quality. Improper installation can result in pattern shifting, fabric wrinkling or loosening, uneven stitches, needle breakage, and thread skipping. These issues reduce efficiency and increase material waste in batch production. Therefore, mastering the correct installation and removal methods for embroidery hoops is a fundamental skill for operating computer embroidery machines.
Common Operational Mistakes
In practice, the following actions tend to cause malfunctions:
-
Pulling the embroidery hoop forcefully during installation, leading to frame deformation or misalignment.
-
Starting embroidery without confirming that the frame is securely locked, allowing the hoop to shift during operation.
-
Applying excessive clamping force on the fabric, causing irreversible stretching deformation.
-
Striking the machine frame forcefully during removal, damaging the positioning clips or connection brackets.
Avoiding these mistakes reduces equipment failures and rework rates.
Components of the Embroidery Hoop and Their Functions
Understanding the function of each part facilitates correct operation.
Outer Hoop
Provides the overall supporting structure and secures the relative positions of the inner hoop and the fabric.
Inner Hoop
Presses the fabric against the outer hoop and controls the flatness of the embroidery area.
Adjustment Screw / Locking Mechanism
Adjusts the clamping force between the inner and outer hoops, directly affecting fabric tension stability.
Positioning Clips and Connection Brackets
Used to attach the embroidery hoop to the machine frame system, ensuring accurate embroidery positioning.
Installation Steps for the Embroidery Hoop
Step 1: Placing the Fabric and Backing Material
-
Place the backing material on the reverse side of the fabric, aligned with the center of the embroidery area.
-
Ensure there are no wrinkles or air bubbles between the fabric and the backing material.
Note: Do not stretch the fabric in advance, and do not alter the natural grain direction of the fabric. Maintaining the fabric's natural state helps preserve dimensional stability after embroidery.
Step 2: Installing the Inner and Outer Hoops
-
Loosen the adjustment screw on the embroidery hoop.
-
Lay the fabric flat over the outer hoop.
-
Place the inner hoop into the outer hoop and press down gently.
-
Adjust the fabric tension evenly around the perimeter.
Inspection points:
-
Verify that the fabric is clamped evenly, with no side overly tight or loose.
-
Confirm that the embroidery area remains level.
-
Ensure the outer and inner hoops are fully seated with no gaps.
Step 3: Adjusting the Embroidery Hoop Tension
Tension criteria:
-
The fabric surface is flat with no visible undulations.
-
Tapping the fabric lightly produces a sound similar to a drumhead.
-
No loose areas are present within the entire embroidery area.
If tension is uneven, fine-tune the adjustment screw to redistribute the clamping force.
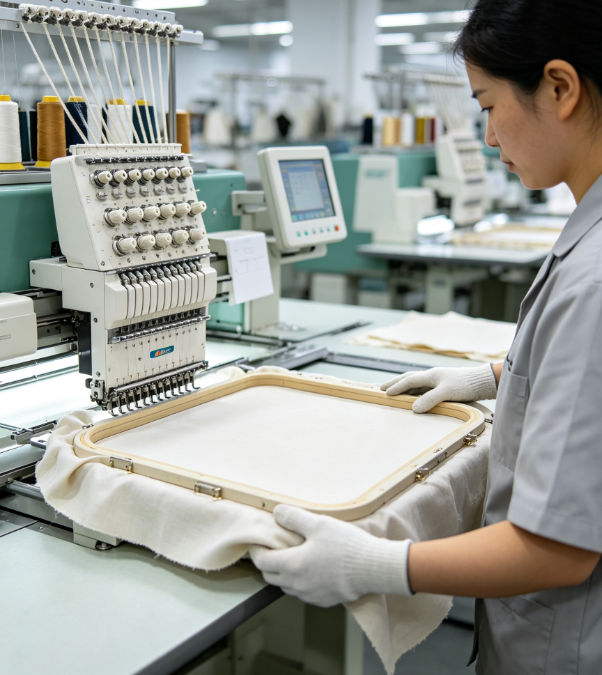
Step 4: Installing onto the Embroidery Machine
-
Align the positioning clips of the embroidery hoop with the corresponding slots on the machine frame.
-
Push the hoop smoothly into the mounting position until a click indicates the lock is engaged.
-
Confirm that the lock is securely fastened.
-
Manually move the embroidery frame to check for sufficient operating clearance, ensuring no collision with other components during embroidery.
Correct Method for Removing the Embroidery Hoop
1. Stop Machine Operation
Before removal, stop the embroidery program, confirm that the needle bar is in a safe position, and wait for the frame to come to a complete stop. Removing the hoop while the equipment is moving can damage the needle bar or the embroidery frame.
2. Release the Securing Structure
Loosen the lock on the machine frame, hold both sides of the embroidery hoop with both hands, and withdraw it horizontally. Avoid tilting or applying force to one side only, as this may deform the positioning clips.
3. Remove the Fabric
First, loosen the adjustment screw on the embroidery hoop, separate the inner and outer hoops, and then take out the fabric smoothly. Do not forcefully pull the embroidered piece, use tools to pry the hoop, or strike any components.
Common Issues and Solutions
Issue 1: Pattern shifting during embroidery
Causes: Hoop not securely locked, insufficient fabric tension, improper backing material.
Solutions: Re-lock the frame, adjust fabric tension, and replace with an appropriate backing material.
Issue 2: Wrinkles appearing on the embroidered piece
Causes: Excessive fabric stretching, uneven clamping force, overly high stitch density.
Solutions: Reduce clamping force, reinstall the fabric, and lower stitch density appropriately.
Issue 3: Frequent needle breakage
Causes: Misaligned hoop installation, collision between the frame and the needle plate, fabric thickness exceeding the hoop's range.
Solutions: Check the frame mounting position, reduce embroidery speed, and replace with a properly sized hoop.
Following the above procedures effectively reduces quality problems caused by improper hoop installation. It is recommended to manually test the frame stability after each installation and develop the habit of checking before starting operations.